请安装系统英文翻译,Introduction to the Importance of System English Translation
Introduction to the Importance of System English Translation
In today's globalized world, effective communication is key to the success of any business or project. For companies operating in an international environment, ensuring that all system documentation is accurately translated into English is crucial. This not only helps in reaching a wider audience but also enhances user experience and customer satisfaction. In this article, we will guide you through the process of installing an English translation system for your organization.
Understanding the Need for an English Translation System

Whether you are a software developer, a system administrator, or a business owner, the need for an English translation system is evident. Here are some reasons why installing such a system is beneficial:
Global Reach: By translating your system documentation into English, you can cater to a larger audience, including non-native English speakers.
Improved User Experience: Accurate translations make it easier for users to understand and navigate your system, leading to higher satisfaction rates.
Professionalism: A well-translated system reflects positively on your organization's image and professionalism.
Cost-Effective: Investing in a translation system can save you money in the long run by avoiding costly manual translations.
Choosing the Right English Translation System

With numerous translation systems available in the market, it is essential to choose the right one for your organization. Here are some factors to consider when selecting an English translation system:
Accuracy: Ensure that the system provides accurate translations, as inaccuracies can lead to misunderstandings and errors.
Speed: Look for a system that offers quick translations without compromising on quality.
Customization: Choose a system that allows you to customize translations according to your specific needs.
Support: Ensure that the system provider offers reliable customer support to assist you with any issues that may arise.
How to Install an English Translation System

Once you have selected the right English translation system, follow these steps to install it:
Download the Installer: Visit the official website of the translation system provider and download the installer for your operating system.
Run the Installer: Open the downloaded installer file and follow the on-screen instructions to begin the installation process.
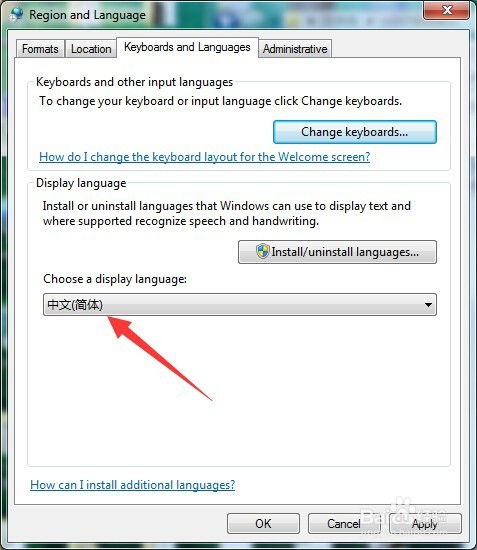
select Installation Options: Choose the desired installation options, such as the installation directory and additional features.
Complete the Installation: Once the installation process is complete, restart your computer to ensure that all changes take effect.
Configure the System: Open the translation system and configure it according to your organization's requirements. This may include setting up language preferences, defining translation rules, and integrating the system with other tools.
Test the System: Before fully deploying the system, test it to ensure that it meets your organization's needs and that translations are accurate.
Best Practices for Using an English Translation System

After installing your English translation system, it is essential to follow best practices to maximize its effectiveness:
Regular Updates: Keep the translation system updated with the latest language packs and updates to ensure accurate translations.
Training: Provide training to your team members on how to use the translation system effectively.
Quality Control: Implement a quality control process to ensure that translations are accurate and consistent.
Feedback: Encourage users to provide feedback on the translation quality to help improve the system over time.
Conclusion
Installing an English translation system is a crucial step for any organization looking to expand its global reach and improve user experience. By following the steps outlined in this article, you can successfully install and configure a translation system that meets your organization's needs. Remember to choose the right system, follow best practices, and continuously monitor and improve the translation quality to ensure the best possible outcome.
Tags
- English translation system
- Installation guide
- Best practices
- User experience
- Global reach